My system won’t boot

The other day I encountered a problem where a machine had a fairly fatal error when trying to boot up, with this error:

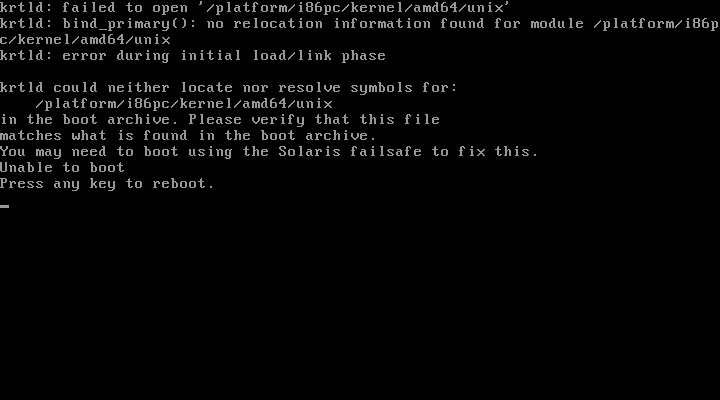
krtld: failed to open '/platform/i86pc/kernel/amd64/unix'
krtld: bind_primary(): no relocation information found for module /platform/i86pc/kernel/amd64/unix
krtld: error during initial load/link phase

or as can be more fully seen in the screen shot:

krtld_boot

After rebooting and selecting safe mode from the GRUB menu I then imported the syspool and mounted up the current boot image filesystem:

# zpool import -f syspool
# zpool get bootfs syspool
NAME     PROPERTY  VALUE                   SOURCE
syspool  bootfs    syspool/rootfs-nmu-000  local
# mount -F zfs syspool/rootfs-nmu-000 /mnt

At this point I needed to inspect the boot_archive file as instructed, which is fairly easily done thus:

# mkdir /a
# cd /mnt/platform/i86pc/amd64
# lofiadm -a `pwd`/boot_archive
/dev/lofi/1
# mount -F hsfs /dev/lofi/1 /a
# cd /a
# ls
boot    etc     kernel

Walking through the boot_archive image I observed that we had no platform directory – so no wonder the machine couldn’t find the unix kernel file.
At this point I assumed the boot_archive file was somehow corrupt and as per so many documents, decided to rebuild the archive using bootadm:

# bootadm update-archive -R /mnt
updating //platform/i86pc/boot_archive
updating //platform/i86pc/amd64/boot_archive

After this, I unmounted /a, destroyed the lofi device, unmounted /mnt and exported the syspool before rebooting, only to find the exact same error.
At this point I got the machine booted once more from failsafe and decided to check the location of the unix file for a 64 bit kernel:

# ls -l /mnt/platform/i86pc/kernel/amd64/unix
-rwxr-xr-x 1 root sys 1903080 Sep 9 02:09 /platform/i86pc/kernel/amd64/unix

Hmm, this file does exist so why doesn’t it get copied into the boot_archive file?
After poking at this for a while and trying to read up on the process of boot archive creation, I eventually turned to the source and started seeing references to a cache directory, which turned out to be the archive_cache directory here:

/platform/i86pc/archive_cache
/platform/i86pc/amd64/archive_cache

Upon checking these directories it turned out that the platform sub-directory had been removed, thus any attempt to rebuild the boot_archive file was doomed to failure.
There’s very little documentation about the archive_cache and even less about fixing it when it’s corrupt – there’s nothing in the man page.
Trying to be clever I took a copy of the platform directory from a similarly configured machine, copied that over to the 32bit and 64bit archive_cache directories, then rebuilt the boot_archive file again.

Upon rebooting the machine this time, I got this error:

boot_corruption


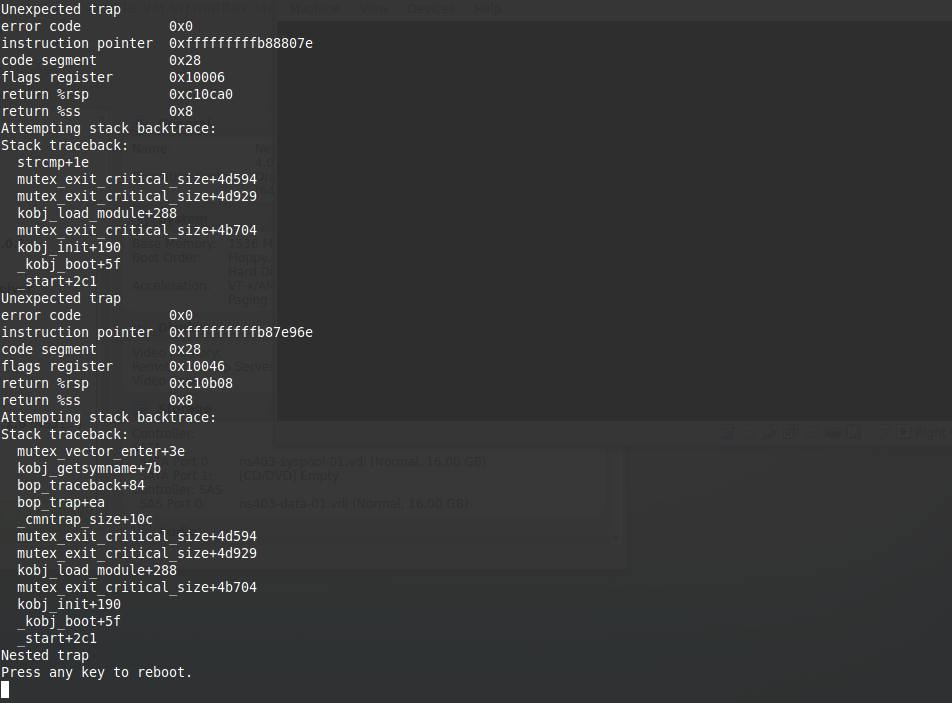
Alas this just goes to show that not all machines are identical and when you’re dealing with the kernel and dynamic kernel modules, everything has to be exactly right.
At this point I also tried being clever and thought that if I deleted the archive_cache directories, then created an empty archive_cache directory with the same permissions, that bootadm would find nothing in the cache and repopulate it?

Apparently not – if you do this you end up with a small boot_archive file and nothing in the archive_cache.  This was me trying to outthink the software when in reality I was being too smart.

Pudding-Brains-640x640

It turns out that if you delete the archive_cache directories completely, then bootadm will notice this, recreate the directory for you and then create a valid boot_archive file.

# bootadm update-archive -v
archive cache directory not found: //platform/i86pc/archive_cache
archive cache directory not found: //platform/i86pc/amd64/archive_cache
 new /boot/acpi/tables
 new /boot/solaris/bootenv.rc
need to create directory path for //platform/i86pc/archive_cache/boot/solaris
need to create directory path for //platform/i86pc/amd64/archive_cache/boot/solaris
 new /boot/solaris/devicedb/master
need to create directory path for //platform/i86pc/archive_cache/boot/solaris/devicedb
need to create directory path for //platform/i86pc/amd64/archive_cache/boot/solaris/devicedb
cannot find: /etc/cluster/nodeid: No such file or directory
 new /etc/dacf.conf
need to create directory path for //platform/i86pc/archive_cache/etc
need to create directory path for //platform/i86pc/amd64/archive_cache/etc
 new /etc/devices/devid_cache
need to create directory path for //platform/i86pc/archive_cache/etc/devices
need to create directory path for //platform/i86pc/amd64/archive_cache/etc/devices
cannot find: /etc/devices/mdi_ib_cache: No such file or directory
 new /etc/devices/mdi_scsi_vhci_cache
cannot find: /etc/devices/retire_store: No such file or directory
 new /etc/devices/pci_unitaddr_persistent
 new /etc/driver_aliases
 new /etc/driver_classes
 new /etc/mach
 new /etc/name_to_major
 new /etc/name_to_sysnum
.
.
.
 new /platform/i86pc/kernel/amd64/unix
 new /platform/i86pc/kernel/unix
.
.
.
 new /platform/i86pc/ucode/AuthenticAMD/3010-00
 new /etc/zfs/zpool.cache
need to create directory path for //platform/i86pc/archive_cache/etc/zfs
need to create directory path for //platform/i86pc/amd64/archive_cache/etc/zfs
updating //platform/i86pc/boot_archive
Unable to extend //platform/i86pc/boot_archive... rebuilding archive
Successfully created //platform/i86pc/boot_archive
updating //platform/i86pc/amd64/boot_archive
Unable to extend //platform/i86pc/amd64/boot_archive... rebuilding archive
Successfully created //platform/i86pc/amd64/boot_archive

Upon creation of the new boot_archive, I rebooted and the system came up normally.


Intel SASUC8I host bus adaptor (HBA)

As I mentioned in the previous posting, the Intel SASUC8I is an excellent HBA for attaching both SAS and SATA disks.  The card is a vendor rebranded LSI SAS 3081-E which means you can obtain firmware for it from the LSI homepage, here:

http://www.lsi.com/products/storagecomponents/Pages/LSISAS3081E-R.aspx

When I purchased my Intel SASUC8I it came with the following firmware and BIOS:

MPTFW-01.26.00.00-IE
MPTBIOS-6.24.00.00 (2008.07.01)

The card worked just fine but after a bit of research I noticed the LSI were offering an updated version:

MPTFW-01.33.00.00-IE
MPTBIOS-6.36.00.00 (2011.08.24)

As you can see, some 3 years worth of updates and fixes, so usually a worth while update and by the looks of it, possibly the last update for this card.

At this point I’m going to say that whilst I encountered no problems with this procedure and that my HBA came back fine after the flash update, I should advise that you’re probably going to void any warranty you might have on that card (assuming it’s fairly new and shiney).

FLASH UPDATE THE HBA AT YOUR OWN RISK !

Still with me?  After downloading the DOS/Windows package from the LSI site, I attempted to use the DOS utility to flash my card but it just wouldn’t run from the DOS environment I’d created.

I noticed LSI offered a Linux zip file, so I downloaded this, created a bootable Linux Mint image, put the LSI firmware and flash utility on that USB stick and set about booting and then flashing the firmware on this HBA using their sasflash utility.

As others have discovered and quite logically, the sasflash command won’t (initially) let you flash the Intel SASUC8I card with non-Intel branded firmware.  It makes sense for Intel to do their own quality control and testing, releasing firmware they believe has passed their own Q&A, however when you’re three years behind the current version it can suck a little.

Fortunately the sasflash utility has a -o switch (expert mode) that allows you to override the vendor/brand check and go ahead (at your own risk) to flash the firmware and BIOS in the card to the LSI branded version.

You’ll need to ensure you use the right version of the firmware as there are different hardware versions of this particular card (B1, B2, B3).  If you don’t know which version you’re using, download the LSI Util package from the LSI web site and then run up the tool. On NexentaStor and Solaris x64 this looks like:

# lsiutil

LSI Logic MPT Configuration Utility, Version 1.63, June 4, 2009
1 MPT Port found

     Port Name   Chip Vendor/Type/Rev    MPT Rev  Firmware Rev IOC
 1.  mpt0        LSI Logic SAS1068E B3     105      01210000    0

As you can see this is a revision B3 board, so I needed to use the 3081ETB3.fw firmware file, using the following command:

# sasflash -o -f 3081ETB3.fw -b mptsas.rom

If you perform this you’ll see something like:

Product ID and Vendor ID do not match.
Would you like to flash anyway (y/n)?

Just go ahead and answer yes to the question to get yourself on the latest LSI firmware so you can proactively rule out any known issues.

My little ZFS NAS lab box

Building a ZFS machine

Back in the day, when I worked at Sun Microsystems, they had the most incredible lab – full of every type of machine, storage array and funky device that Sun manufactured.

In the UK these were maintained by an amazing set of guys headed up by Paul Humphreys and no job was too much for them to tackle, from setting up entire solutions of servers connected via switches to storage arrays (log ticket, let me know when it’s all hooked up) to just simple requests looking for a specific type of server.
When Sun UK were still based at Guillemont Park, the lab took up a huge section of the ground floor for one of the main buildings and it was quite a sight to behold and to hear (thank goodness for the mandatory ear protectors).

I remember my primary ZFS lab box used to be an X4500 because it had lots and lots of disks, thus I could be testing multiple different customer problems on this single piece of hardware, thus reducing the number of lab boxes I had booked.
It was a fantastic box (once those Marvell SATA controller bugs were fixed) and I was exceptionally sad to give up my booking when I left Snoracle.

The Mini (me) X4500

P1030357

Now that I work from home it would be difficult to own an X4500 / X4540 or variant thereof, frankly the noise in my office would be a complete nightmare and the power consumption would be a little worrying.  Sure it’d keep me warm during the winter but my Mac Pro does a pretty good job there.
Therefore I went about looking for a machine that could be used as a SOHO ZFS lab box.  The requirements were:

  • It had to be quiet
  • It had to have a small footprint
  • The power consumption had to be reasonable (no getting an electrician in for a new 3 phase power supply)
  • It had to have 4 drive bays (one boot drive, three free for playing with various zpool configs)
  • It had to be reasonably inexpensive
  • The driver support had to work for Solaris / Nexenta / Illumos variants

After some research I settled upon an HP Proliant Microserver N40L as it ticked all these boxes and then some!
The other thing going for the HP N40L was a £100 cashback offer, which certainly helped fund the memory upgrade to 8GB because we all know ZFS likes memory, lots of memory.
HP seem to do this on a regular basis, so right now I see Ebuyer are offering the replacement machine, the ProLiant N54L for £209.99 with £100 cash back, which seems like quite a bargain.

I discovered that not only could I populate this machine with 4 x SATA drives in the front bay but various clever people had purchased a 5.25″ drive bay to sit in the empty slot that would have been taken up by the DVD drive (if you’d configured that as an extra option) and then hooked that up to a SATA or SAS PCI Express HBA.

At the time I remember there were two options – a 6 slot (MB996SP-6SB) or a 4 slot Icy Dock drive cage (MB994SP-4S).  I was initially tempted to buy the 6 slot device but the more I thought about this, the more I got worried that there would be insufficient power to drive 6 disks, either HDD or SSD or a combination of the both.
The dock takes two molex connectors to provide power to the disks and there’s just a single molex power connector inside the HP designed to power the DVD drive, which would mean buying a splitter cable.
Then there’s the matter of squeezing 6 disks into such a small space – any disks purchased would have to be very low profile, otherwise they just wouldn’t fit!

icy dock mb994sp4s

Once I’d given it some thought I figured the 4 slot Icy Dock sounded like the best option, mainly due to the worry over power draw.  After all I wouldn’t be the first person to experience pool corruption due to power problems, as my friend Andy Harrison found out:

http://www.stormsail.com/zfs-fun-and-games/

Having selected my 4 drive bay dock I then had the job of figuring out which drives to buy and how to connect this up so they’d be seen to the system.
The Icy Dock is both SATA and SAS compatible which gave me an interesting choice – buy a SAS HBA at a higher cost or a SATA HBA which would be much cheaper.

Of course hardware is nothing without the drivers and this was an interesting sticking point.  SATA controllers come and go, chipsets come and go which means trying to buy an established card with good driver support (hoping the card is still readily available) or buy a newer card and hope the driver works.

On the other hand because Solaris and its derivatives have an Enterprise background, the SAS support is much better and when you think SAS, invariably you think of LSI controllers.
There is a problem with this approach though – LSI cards tend to be expensive and only available from more specialist dealers.

After a lot of research I found the Intel sasuc8i card, which is a rebadged LSI HBA with the 1068 chipset and been supported in Solaris for a number of years.  Also going in its favour was the fact that I could pick one up online for about £130, considerably cheaper than the currently available LSI badged cards.
You can also install the current LSI firmware on the card (with a little bit of a kick) thus ensuring you don’t have to wait for Intel to push out updates.

Having sorted out the drive dock and a SAS HBA this just left:

  • A Startech 50cm SAS cable to 4x latching SATA ()
  • A Molex 4 pin, Y shaped power splitter cable
  • 2 x 500GB Samsung Spinpoint M8 disks
  • A USB Samsung SE-208 DVD drive (for O/S installation)

intel_sasuc8i sata_cable molex

After waiting for all the parts to arrive it was time to fit the Icy Dock, disks, HBA and cables.  The thing about the Microserver is that it’s a really compact machine, so fitting the HBA is fiddly – it helps to have small hands.  Thankfully my wife is always up for a challenge and got stuck in, disconnecting the various plugs on the motherboard, sliding out the motherboard and fitting the card.

The 4 way SAS/SATA cable proved to be tricky.  After attaching this to the Intel sasuc8i card and hooking it up to the Icy Dock, I found that the Samsung disk wasn’t recognised.
The machine was powered off and my wife double checked the cables, only to find that you have to give the SAS/SATA cable a really, really good push to insert into the HBA and get a solid connection.

One boot up later and the disk was still not recognised by the HBA during the probe/discovery phase.  At this point I figured I would try the other disk I’d purchased and after screwing this into the caddy and powering up again, success we had a disk that could be seen.
This meant either a DOA disk or a bad connection.  Moving the disk to the other slots proved they were fine and putting the suspect disk into a USB caddy proved it couldn’t be seen on my Mac, so it was back to the vendor a replacement.

Once the hardware was seen it was time to burn a NexentaStor DVD, hook up the Samsung DVD drive and then boot and install the software on the internal 250GB SATA drive and create a mirrored data pool on my two 500GB Samsung Spinpoint drives.

I’ll leave the details on this for another post.